 medium.com/@smarthomespot?source=rss-55df7cff2d3------2
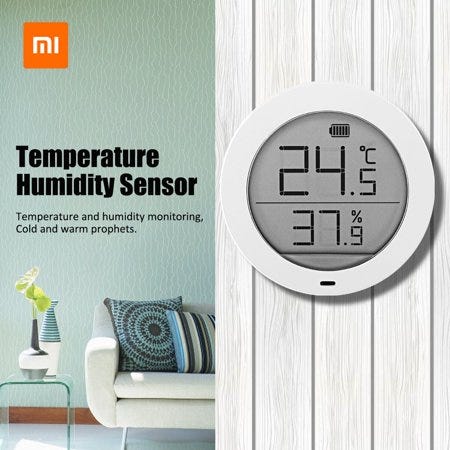
Hello today I will give you the presentation on the temperature and humidity sensor from Xiaomi but with an LCD screen allowing a direct reading. I took advantage of one of my good plans to buy some, integrate them into my home automation system but above all to present it to you.
His connection at first was a real debate about his protocol because many people thought it was ZigBee or Wi-Fi but all in all it is Bluetooth. Unfortunately it will be necessary to be next to this module to get feedback but if you have some products from Xiaomi communicating in Wi-Fi with your box integrates Bluetooth protocol to serve as a gateway. I will tell you more about it in this article to list the compatible products.
To have it in service for several months at home, I can tell you that the quality is really good like the batteries.
1° Technical data :
Having compared the accuracy of the temperature with different probes I have at home, we find at 0.1 and 0.3°C the same value, what I find is really very good. Unlike the Aqara temperature and humidity sensor, which is also very reliable, having a direct visual on your screen is a real plus, which means you can avoid taking your smartphone out.
Here are some technical features:
- Brand: Xiaomi.
- Model: Mijia LYWSDCGQ/01ZM.
- Protocol: Bluetooth.
- Accuracy Temperature: 0.1 °C.
- Temperature range: Between — 9.9 °C and + 60 °C.
- Humidity range: Between 0 and 99%.
- Screen size: 1.78 inches.
- Humidity accuracy: 0.1 %.
- Power supply: 1 AAA 1.5 Volt battery.
- Nominal power: 0.18 mW.
- Dimensions: 60.8 mm x 60.8 mm x 60.8 mm x 22.5 mm.
- Weight: 43 Grams.
2° Unpacking and presentation:
This time we will not have a packaging in a cardboard box but in a transparent plastic showing the product. A little like we find in the shelves of large surfaces since a tab with a hole allows to put it in shelving.
On both sides, we can see three icons indicating:
- The temperature.
- Moisture.
- The Bluetooth connection.
On the rear part at the bottom left, we will find some descriptions of the technical characteristics but only in Chinese. Only the model and the identification number are visible in numbers.
In the content we find:
- The temperature — humidity sensor.
- Its magnetic and adhesive wall mount.
- A battery (to see depending on the site sometimes it is not provided).
- A user manual only in Chinese.
Let’s take a look at this temperature — humidity sensor:
As you can see, the quality of the matt white plastic is really very good as is its finish. On the lower part, there is a small hole to allow the passage of the different temperature and humidity sensors.
The screen is protected by a small transparent plastic film to avoid scratches. Since it is well applied, I even left it in place, which does not interfere with its readability.
On the back part we can note:
- The arcuate location of the support that fits into it.
- The cover for the battery compartment.
- The grey button with the Bluetooth logo for pairing.
As I was saying, at a glance it will be possible to see:
- The Bluetooth link whether it is active or not.
- The battery status via five small bars that indicate the battery level.
- Temperature in °C.
- The percentage of humidity.
3° Pairing of the sensor :
The pairing of this temperature sensor is not mandatory to have the latter to be used. This will only be done via the Bluetooth connection. To do this, once you are in the “Mi Home” application go to the top right on “+” to add it.
Instead of searching through the entire device list, simply go to the “Bluetooth” icon also located at the top right.
If you have already started Bluetooth on your Smartphone, normally the temperature sensor is automatically raised in the “Add a device” section. In the “My devices” section, you can find your different devices already matched. Simply click on the device in question to start pairing.
Now simply press the grey button behind your sensor for about two seconds. A small window will appear quickly to confirm the correct pairing.
A new small window appears before finishing its inclusion asking us to accept the “user agreement and privacy policy”.
Click on “Accept and continue” to complete its installation, otherwise the device will not be included if you click on “Cancel”.
4° Use of the sensor :
This part will be really very fast because to use it, you just have to read the data received by the device.
On the left side is the current temperature.
On the right side is the humidity of the room.
In the middle of the screen, oin finds a kind of “Sens” banner indicating some precision of the temperature and humidity desirable in winter as well as in summer.
As you can already see on the picture above, we will have a temperature but also a humidity curve for the day, week or month. For that to have a real curve and the most precise possible it will be necessary that your Xiaomi temp sensor is connected to a gateway equipped with Bluetooth but that I will talk about it again in the next chapter.
As usual, at the top right, the three small dots, we find the different parameters, since the last update, a large part of the products are translated into French:
- The ability to enable or disable notifications based on a temperature — humidity too high or too low.
- Allows you to create scenarios with other equipment.
- Allows you to access the product FAQ but also to report a problem.
- To add a shortcut directly to your home screen.
- The possibility to change the name of the sensor.
- Allows you to indicate the type of protocol but also the location in which it is located.
- Allows you to share the equipment with someone you know.
- Checking for updates.
- Indicates the different privacy policies.
- Allows you to permanently remove the product from the application.
It’s time to open this topic, it’s official, it doesn’t cost anything to equip your house with a HomeKit! For more than a year Apple has been releasing its smart home and really cool solutions are emerging!
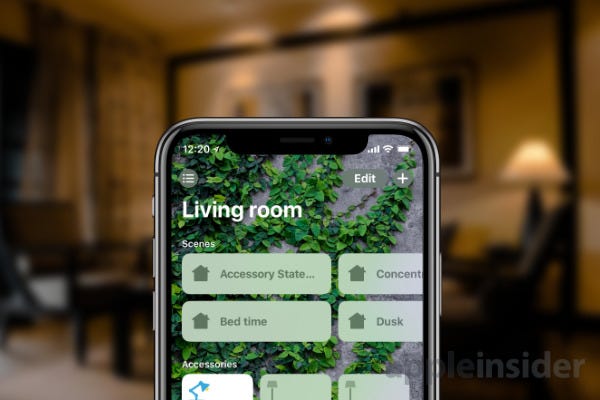
Why choose HomeKit? For its simplicity, everyone goes through the Maison application, which really allows you to do nice things in a few finger movements.
For example, geofence is really efficient and reliable, scenarios are simple to create, everything is centralized and taken into account on all iBidule. It’s really a powerful and very simple solution, from the Apple what. Except that today we have access to accessories at very low cost:)
One of the major advantages of Apple HomeKit solution is that you can mix the origin of your accessories, everything is grouped on the home application and all the accessories interact together! Apart from DIY solutions such as Home Assistant and Openhab, it is one of the open and simple platforms :)
Essential devices
You need at least an iPhone and a HomeKit gateway that will relay between your Bluetooth or Wi-Fi accessory and your phone.
A choice: An iPad, an Apple TV or even better, a HomePod!
HomeKit accessories no hub required
Be careful, take out the money, it’s “expensive”, it’s bulky and autonomy level it’s not the best, but it’s clearly the easiest accessories to implement, they communicate directly via Bluetooth or Wifi with your Apple gateway.
Eve
Apple “historical” brand, Good reputation.
Operates in LV
Variety of accessories available (from the smart socket to the water programmer for the garden: D)
Expensive, ~50$ per smart plug.
Fibaro
Good reputation in the world of home automation: D
Only one accessory (relay)
Dear, very, very dear! 60$ the single relay: pfff:
Sonoff
It REALLY costs nothing, 5$ the basic sonoff, which is a wifi relay to insert on the wire of what you want to connect, a heater, a roller shutter? no problem.
It is not HomeKit compatible, in the process of certification since August BUT, an alternative firmware exists to make it compatible.
I’m going to try the HomeKit adventure because I only have two accessories left to make (or 3, I’d like station monitoring to be HomeKit compatible) compatible, my roller shutter (with a 10$ sonoff it’s set) and my towel warmer (a basic sonoff and that’s enough).
HomeKit accessories that require gateway
Aqara
It costs nothing, 30$ for the ZigBee hub and about 10$ depending on the offers for an accessory (smart motion sensor, smart water sensor, smart door window sensor etc…)
It’s ZigBee, it’s small, it doesn’t consume anything, we hold several years on CR2032: D And frankly the accessories are really well finished: whistle:
Good reputation, the range has been around for years:)
Some accessories announced but not released, like the 2ch relay that I miss to finish my home automation: crazy:
It’s Chinese, the gateway speaks Chinese, the plug is in Chinese format, you have to order in China… Software in English, it is only used to pair accessories;)
IKEA TRÅDFRI
Compatible with the Hue Gateway except for updates.
Often major failures, the last update for the smart plug that finally made it HomeKit compatible has been removed.
Few HomeKit compatible accessories, smart bulbs and plug only.
Requires the TRÅDFRI gateway for updates to make them HomeKit compatible.
Philips HUE
Compatibility of all Hue accessories with HomeKit!
Gateway compatible with several brands using the ZigBee protocol (IKEA, OSRAM, Chinese noname) but be careful, Hue gateway compatible does not mean HomeKit compatible, the accessory must be compatible;)
Excellent software for iPhone and iPad.
Good sensor/remote control autonomy (there is even a remote control without batteries…)
It’s expensive: / 40$ for a presence sensor (+light, temperature and humidity: D).
What is a smart alarm?
We mean any device or sensor designed to ensure the safety of a home. What it means is that it can just as easily be a high-tech surveillance camera, a simple fire detector or a more complete system of opening, motion and video surveillance sensors.
We mean the connection between this alarm and an internet box and/or a smartphone. In practice, combined with the existence of a dedicated application, this allows the user to keep an eye on his smart alarm system and even, sometimes, to control it remotely at any time from his mobile phone. In the case of video surveillance, this means the possibility of monitoring what is happening in your home live. Since you are directly notified in the event of an intrusion, it becomes much easier to take the necessary measures — by cancelling the alarm for a false alarm, or by letting the system contact the police itself.

How does a smart alarm work?
In the case of independent sensors, especially cameras, the operation is quite simple since only one device is connected to the Internet. The principle is no different from most connected objects, which allow you to interact directly from your smartphone.
The smart alarm systems are not so different, since the packs consist of several sensors connected together by a central unit. These modules are essentially wireless, which means they can be easily installed in any part of the house without the need for a connection. Also, it means that you can buy as many sensors as you want to connect them to your network, creating the alarm system that best suits your needs. Most of these sensors are powered by long-lasting batteries, with an autonomy of around 2 years. Those requiring a wired connection also have a battery for several hours to protect you even in the event of a power failure.
Once connected to your router, the central unit will gather all the information transmitted by the sensors and make it available to you. As soon as an accessory transmits an alert (an opening door, an unwanted movement, smoke…), the CPU of the smart alarm is able to notify you via a push notification, an SMS, an email or even by calling you.
What are the disadvantages?
The problem with packs is that they are often limited. Some offer only the CPU and one or two opening or motion sensors but stop there. To have a more complete system, it is sometimes necessary to obtain additional sensors and other modules (sirens, camera,…) often quite expensive. Before buying, it is therefore essential to draw up a list of the sensors and services you need and look for the pack that most closely resembles them, in order to avoid squandering your purse on additional accessories.
In addition, even if most smart alarm kits are available free of charge, some of the services offered (SMS alerts, on-site intervention) can only be used under subscription. It is advisable to check in more detail the offers that interest you, because an alarm system can appear very complete for an attractive price, and in reality do not offer any additional services unless you pay on a regular basis.
What are the advantages?
The first advantage of a smart alarm is that it is… connected. The ability to check the condition of our house live is already enough to reassure most worried users, as does the promise to be notified by notification or SMS in the event of an intrusion. There is no longer any distance between you and your home: it is the pinnacle of the connected home.
In addition, the abundance of smart alarm kits allows everyone to choose the system that suits them, without having to worry about complex networks. You live in a small apartment and only need an opening and motion sensor? You’ll find what you need. Whatever your choice, the modules can be easily installed in the house (without any DIY work), connected wirelessly to the central unit and set up in a few clicks. In fact, most models are usable within minutes of unpacking and do not require any special skills. Combined with a much lower price than traditional alarm systems, the advantage of the connected alarm is not difficult to perceive.
But that’s not all: not only do you need complete security, the top-of-the-range models also have a home automation box that makes your life easier at all times. Home automation is the art of connecting your home. In short: control the lighting, heating or opening of the shutters with a simple mobile application. It also allows you to simulate a presence when you go on holiday, by turning on and off your lights, television, etc. It could not be more complete.
Which devices for a smart alarm system?
Because any home security kit is never just a set of interconnected devices, it is good to know what we are talking about. A connected alarm is a so-called evolutionary system, you are free to add many sensors (sometimes up to fifty accessories), allowing you to adapt it to your living space. In absolute terms, any of these modules can be added to your system if it is compatible. If you are considering customizing your own, don’t hesitate to take a look.
Door and window sensor
A must-have for any self-respecting alarm system, which is why they are integrated into almost every security package. Door and window sensors are actually magnetic transceivers to be installed on the leaves of the doors/windows to be monitored. In the event of opening, the link between the two modules breaks and the alarm is triggered.
Well, that’s the theory. In practice, many door and window sensors are much more complex than this because they are so sensitive that they detect intrusion attempts. This allows them to sound the alarm before the door has had time to open, providing a powerful deterrent to people who may be malicious to you. This goes even further, since some sensors carry software that allows them to “sort” daily events. For example, a child throwing a ball at a door will not trigger the siren, since the sensors know the typical vibrations of an attempted intrusion. This avoids false alarms: you have more to do with your day than check the efficiency of the system.
Motion sensor
With the door and window sensor, one of the sensors required for any good system and included in almost all packs. In a fairly simple way, the motion sensor analyzes all “massive” movements to detect the presence of intruders in your home. If they have not previously deactivated the alarm via the dedicated application, the alert is launched and you are immediately notified.
Siren alarm
Because no alarm system could be complete without… alarm. This is of course the role of the siren, which, although sometimes integrated with other modules, is sometimes sold as an accessory. If you have produced your sensors one by one, you will probably need to get a siren independently and connect it to your network. Again, each pack is to be checked according to your needs, but most carry a siren with a sound power of about 100 decibels. Sirens provide a deterrent in the event of a burglary. Thieves do not risk staying in a place with an alarm ringing.
Smart Camera
As no system is 100% foolproof, in addition to prevention, you can cure. This is the role of video surveillance, connected cameras that you can consult on your smartphone at any time, as soon as an intrusion is reported to you. Some models launch an automatic registration in case of an alert, others allow you to save several days/weeks of images in the cloud.
It is also interesting to know that a surveillance camera can be used independently of any alarm system, especially for small budgets. Kiwatch cameras, for example, are equipped with built-in motion detectors and sirens, allowing them to detect intrusion, sound the alarm and record all of this at the same time.
In any case, make sure that the camera of your choice has night vision and good image quality. Position it near your door, never point it outside (for privacy reasons) and you will know everything that is happening in your home.
Aqara smart home products launch in Apple Stores in Mainland China
Xiao Mi invested smart home startup company Lumi United has currently brought its Aqara branded products to 42 brick-and-mortar Apple Stores in Mainland China. It’s the first time that Aqara brand has gotten into Apple’s official sales channel. Aqara currently has more than 20 products supporting Apple HomeKit.

There are 5 Aqara products offering for sale at 42 brick-and-mortar Apple Stores in Mainland China, including Aqara Hub, Aqara Wireless Switch Double Rocker, Aqara LED Light Bulbs, Aqara Door and Window Sensor and Aqara Motion Sensor.
Smart home products with ultimate user experience
In pursuit of the ultimate user experience, Aqara smart home products set high standards as Apple so that users can get started in the first time with ease for security protection, home automation and remote control. Take the home security system as an example, through the alert setting of Aqara Hub and Aqara Door and Window Sensors, you can monitor people entering and leaving the house at any time, and you can also set the Hub as a doorbell. In the bedroom, the automatic night light function can be realized by Aqara Hub and Aqara Motion Sensor. In the kitchen, when Aqara Water Leak Sensor monitors the leak, you are able to receive a notification on your smartphone and sound the alarm if needed.
Active expansion into international markets
Aqara products have recently been sold on Amazon in the United States. The arrival of Apple retail stores in mainland China is aimed to get more experience by serving domestic users and to serve international users better soon afterwards. Nowadays, Aqara brand already has taken credit for beautiful product design, complete smart home product line, great product reliability and stunningly affordable product pricing. A growing number of Aqara products will be brought to international market in the future.
Learn More: https://www.aqara.com/us/home.html
XIAOMI AQARA : THE HOMEKIT COMPATIBLE HOME AUTOMATION
Our Apple specialist, Soner, presents us the Xiaomi home automation system recently compatible with HomeKit and therefore Apple.
Xiaomi smart home
If you are interested in home automation and high tech, you probably know Xiaomi. For the two of them who do not know, let’s summarize the brand as follows: Xiaomi manufactures a wide range of products, from smartphones to electric kettles, always aiming for the best value for money.
Knowing the budget that a complete home automation system can represent, the arrival of Xiaomi on this market a few years ago is therefore necessarily good news. The brand has a wide range, covering almost all needs (detectors, various sensors, connected locks, video surveillance, etc….).
Until now, the Aqara range, which includes the manufacturer’s home automation products, has been rather closed in on itself. No compatibility with Google Home or Alexa, and not even HomeKit. But things are changing, compatibility with Alexa is in the pipes, and HomeKit was announced in early summer. And so it is now done, because since the beginning of September it is possible to equip yourself with an Aqara bridge compatible with Apple technologies.
What equipment for Xiaomi Aqara home automation
The principle of the Aqara range is similar to that of Philips with Hue. The user has a bridge, connected to his internet box (here in wifi, no ethernet possible). This bridge communicates with various aircraft in Zigbee. The advantage of this approach is that the devices scattered in the rooms of the house do not have to integrate wifi, which will allow them to be sometimes really small (we will see an example later) and consume very little energy. Important note, if you are already equipped with Aqara products, you will have to change the bridge, because it is he who makes sure to support HomeKit. On the other hand, as far as detectors or sensors are concerned, you can keep them, they only bring the information up to the bridge. Finally, it should be noted that for the moment, due to some limitations of HomeKit, only the following objects can be used in the Aqara range:
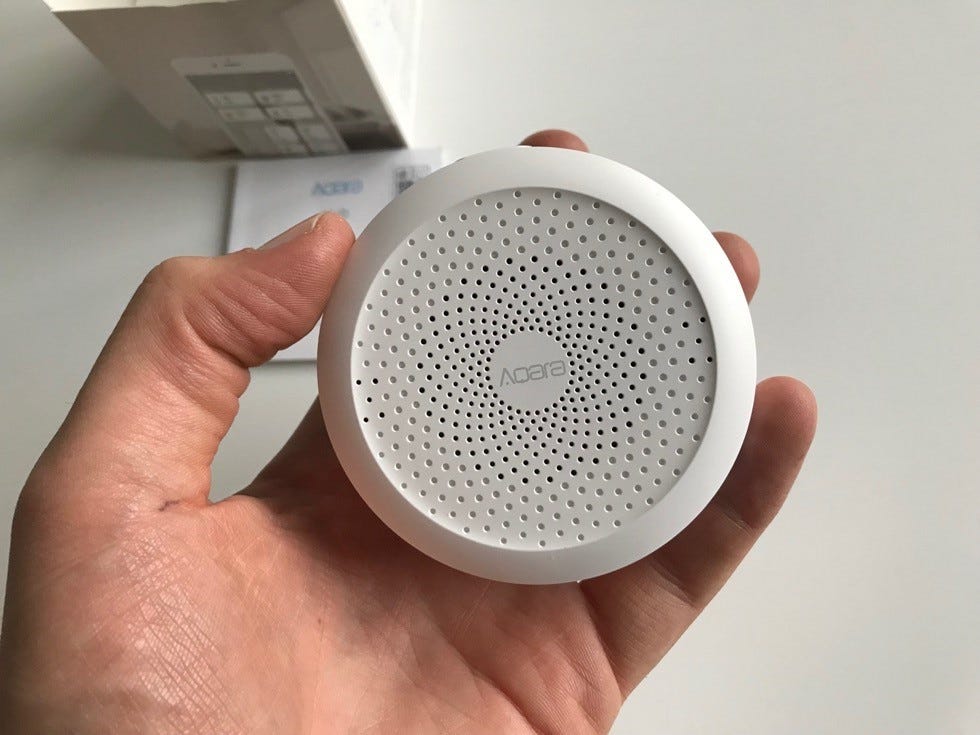
Presentation of the Aqara Hub
The bridge, called the Gateway, is compact. It is slightly smaller than a Google Home mini, and the power plug is directly integrated, so no power adapter. On the whole tower is a light strip, which can change color, and a loudspeaker on the front panel. These two elements will be used during pairing and to provide feedback on certain information.
The packaging is lightweight, but there is no need to overdo it. There is a manual in several languages for starting up the device. You can also find the QR code to flash with your iPhone or iPad. Don’t panic if you lose it, this code is also on the back of the bridge itself.
Installing the HomeKit home automation system
At the first start, the light strip starts flashing and you are greeted by a voice in… Chinese. And yes, let’s not forget, Xiaomi products are still primarily designed for the local market (but we will see later that we can modify this small disadvantage). From there, the usual procedure for HomeKit gadgets. Open the Home application, tap on the little + and choose to add an accessory. The camera then opens to flash the associated QR code. We will then allow the bridge to connect to our wifi network, with the iPhone or iPad then sending the network key directly.
An important aside on this point. First of all, the bridge can only connect to 2.4ghz networks. If you have a full 5ghz network at home, it will inevitably get stuck… But above all, at the beginning, I had a lot of trouble disconnecting the Gateway which then starts flashing yellow and sending audible alerts. The solution in my case was to rename my wifi network, the one I had set up had a point in the name (basically it was my.wifi) and I renamed it by removing the point (in monwifi). From then on things went back to normal and I didn’t have any disconnections in several days of testing.
Once integrated into HomeKit, the Aqara bridge appears as a bulb. The explanation for this is simple, the light band around the bridge can be controlled like a connected bulb. The idea may seem attractive, for example to use it as a night light in a room, but I don’t really recommend it. Indeed, as I told you, in case of a problem the bridge sends audible alerts. It’s really not the kind of thing you want to hear when you’re in your sleep at 4:00 in the morning for example….
That’s it, now the Gateway is well connected to our network, but as it stands, this bridge is not very useful to us. We will therefore pair sensor-type devices, in this case for this test it will be a temperature and humidity sensor that we will detail immediately after.
Add a temperature sensor to Aqara Home on Iphone
We will now pair this sensor to the base. This time we use the Aqara Home application, available on the App Store. The application is not translated into French, but remains easy to use. You start adding a device, choose it on the screen that lists the existing elements in the range, then follow the step by step on the screen. Then we find it on the side of the House application, in order to personalize its name if we wish, and assign it a part.
Aqara Home also allows you to know in detail the status of a device, its software version, and to access additional information, provided you have an Xiaomi account, and this is a subject that we will discuss later, because not everything is rosy on this side… You will notice in passing that at Xiaomi, we didn’t go very far to find inspiration as to the design of the application. *
Thanks to the data uploaded, it is now possible to create scenarios to trigger another HomeKit-compatible device under certain conditions, such as if the temperature drops below 19 degrees, start a connected outlet with an electric heater on it. It is also possible to request information from Siri on iPhone, or HomePod.
Of course, the information is also accessible from an Apple Watch.
Let’s talk about price, the advantage of the Aqara solution is the price of each sensor, ridiculously low. About 8€ for a temperature and humidity sensor, 10€ for an opening sensor… The Gateway costs about 30 euros. You can compare with other market players, you will not find better. And those who are a little allergic to Xiaomi applications, not always well translated, even in English, HomeKit support is the ultimate answer, because if you want you can do without the Aqara Home application completely.
Finally, two important elements. First of all, as I told you earlier, by default the audible alerts are in Chinese. Fortunately, in the Aqara Home application, you can switch them to English, it is always more understandable (see the screenshot below).
Then a little red card to Xiaomi, the Aqara Home application asks, for certain functions such as temperature histories for example, to create an account. Well I never succeeded, I tried several mailboxes, and the validation mail that contains the link to activate the account just never arrives. Fortunately, for all basic functions, it is not necessary to have an active Xiaomi account.
My opinion on the Xiaomi Aqara home automation solution
During the days of this test, the Aqara solution proved to be effective, without any connection problems for both the bridge and the peripherals. Integration with HomeKit is a real plus for this product, of course if you are fully integrated into the Apple ecosystem and want to equip your home for a tight price. For my part, the choice has already been made, and you will surely be entitled to other tests of Xiaomi HomeKit compatible products right here in the future!
Many of the users that use Xiaomi’s MiJia environment already have, among other things, the Aqara switches installed in our home. In fact, it’s not the first time we’ve talked to you about them, since they offer us a series of advantages when it comes to domotizing our home that few products can offer us.
In many places we will find them as “Xiaomi Aqara switches” but as it usually happens, this only obeys to a propagandistic eagerness that has nothing to do with the reality, because Lumiunited is the one in charge of making them.
While it is true that also produces some products directly for Xiaomi, the Aqara range is out of their control, so much so that recently announced that all products of the brand Aqara will be compatible with the new Gateway and in turn with Apple Homekit, while MiJia products will not have this compatibility.
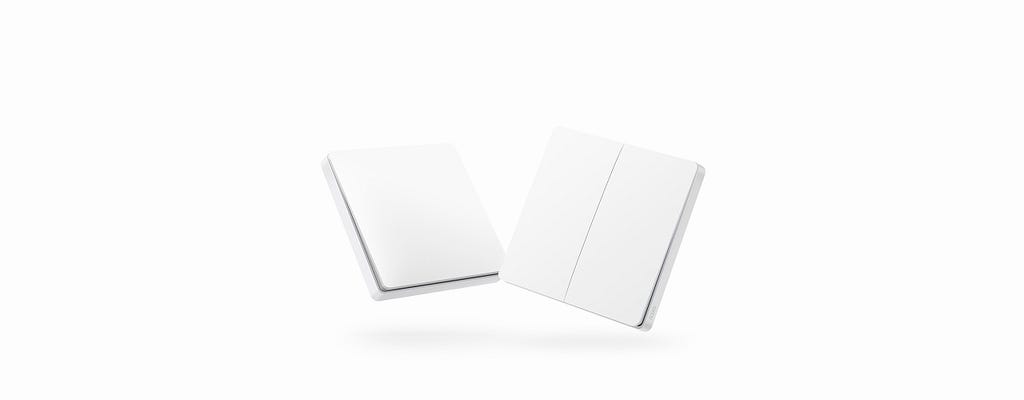
But what concerns us today are the new Aqara Upgraded Edition that they have just launched, renewing their old wireless wall switches, this update although it comes by surprise is not surprising at all, let’s see why.
Wireless switches for Xiaomi’s MiJia environment are one of the best products we can buy.
Aqara wireless switches are a great invention, they allow us to replace switches, allow us to add additional switches to a room or place them discreetly, easy to install and use, resulting in a perfect complement to Aqara’s built-in switches.
One of the most striking things about the previous model is that the Aqara wireless wall switches had only one possible action per key, adding up to three total actions on the two-button model by pressing both keys simultaneously.
We were so used to Xiaomi and Aqara’s MiJia wireless switches with more than one action per device that this was a curious fact.
Looking back we see how the Mijia Wireless Switch offered us up to three actions, a pulsation, double pulsation and prolonged pulsation, which allows us to control three different scenarios, on the other hand the Aqara Wireless Switch arrived with only two actions, pulsation and double pulsation, small failure of Aqara later corrected with its model Aqara Wireless Switch Advanced which had up to 4 actions, pulsation, double pulsation, prolonged pulsation and agitate.
This new version of Aqara Wireless Switches comes with up to 7 configurable scenes
Once again, Aqara is launching a revision of one of its products in order to provide it with more capacities, as these new switches for the MiJia environment come with the possibility of carrying out three actions for each key.
The one key model now has pulsation, double pulsation and long pulsation.
While the double key model can add up to seven actions:
Left key — pulsation, double pulsation and prolonged pulsation.
Right key — press, double press and long press.
Simultaneous pressing of both keys.
This makes the not inconsiderable figure of two and four more available actions respectively with respect to the previous models, a great success on the part of Aqara.
Having a Gateway for the MiJia environment is indispensable.
As in previous models, the Zigbee wireless communication protocol is used, so you must have a gateway to be able to use these switches.
The use of the Zigbee protocol is logical since it maintains the compatibility line with the previous devices, the connection is more stable and has the advantage of a smaller delay in the communication/execution of the commands between the different devices connected to the same gateway in addition to having a low consumption of electricity that allows an estimated duration of its battery of two years.
The possibilities offered by wireless switches within the MiJia environment of Xiaomi are very extensive
Innovative and versatile design, each key that we place not only replaces a traditional one or adds an additional one, but it will allow us to take control of many other devices, the addition of two extra actions to the model of a single key can address both the control of light, such as curtains and air conditioning, for example.
Nest has just unveiled its new product range with the arrival of the Nest Cam. The Nest detector switches to version 2.0 and the thermostat gains an update of its firmware. This is a real breakthrough for the range of home automation products.
Nest informed there will be something new in its range of smart products. The company acquired by Google in January 2014 has just announced an update of its surveillance camera and smoke detector as well as the firmware of the Nest thermostat.
Nest Cam: smart video surveillance
After buying the American surveillance camera specialist Dropcam last year (for $500 million), Nest was expected to release his own smart camera. This is now done with the Nest Cam, a surveillance camera whose technical data and design cannot deny their filiation with the Dropcam Pro.
The object is capable of filming in 1080p at 30 FPS with a 130° viewing angle and has an effective night mode up to 6 meters thanks to 8 infrared LEDs. A small subtlety of design, the base of the camera is magnetized so as not to have to drill holes to install it.
The camera works in conjunction with an Android or iOS application that allows you to monitor what’s happening at home at any time or receive a notification in case of suspicious movements or noise. A loudspeaker on the Nest Cam allows you to talk to anyone in the house remotely. Best of all, you can stream your video stream live on YouTube, a few examples are available on the Nest channel.
A subscription service called Nest Aware allows you to record videos in 10 and 30 days and offers a more efficient detection system that automatically selects any suspicious event that occurred during the period to be broadcast to you. This subscription will cost between 10 and 30 euros per month. The Nest Cam will be available in Europe from July at a price of 199 euros.
Upgrade for Nest Protect 2.0 and software update for thermostat
The famous Nest Protect smoke detector is also improving with a small design facelift that makes it easier to change batteries. The new sensor makes it possible to distinguish between slow fires and fast fires. Another change in size is that the Nest Protect will have to be renewed every 10 years instead of 5 years for the first version. The price remains the same and the Nest Protect 2.0 is available for 119 euros.